|
| Manage MDL verification studies |
 |
The LabCal MDL Calculator supports the management of Method Detection Limit verification studies for the analytical laboratory. This utility allows the creation of new MDL studies for any analytical method configured in LabCal, supports the automated processing and statistics generation for the MDL trials, and tracks all method MDL study data in a historical archive.
USAGE:
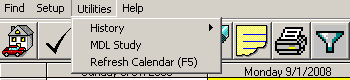
1. Open LabCal, select the Utilities menu, and select the MDL Study menu item.
2. Create New MDL Study
Locate the row of buttons at the top of the MDL Study form and click the New button. The New MDL Study window will open. Fill out fields for Method, Run Date, #Trials and Run By, then click the OK button. The new MDL study will be created and displayed as the current study in the MDL Study form.
3. Enter Analytical Result Data for current MDL Study
In the MDL Study form spreadsheet grid, enter MDL result data for each Test Analyte row. Enter the concentration of the standard used for the study into the Std Conc column. Enter test result data for each trial replicate into the respective TRIAL(n) column. After typing in a trial result, pressing the Enter key will accept the cell entry and move you to the next column in the row. You can also use the mouse or the Arrow keys to move around the spreadsheet.
4. Calculation of Statistics for MDL Study
The Standard Deviation for each row of MDL trail replicates will automatically be calculated as you enter trial data, and the statistic will appear in the Std Dev column. The calculated MDL value will automatically appear in the Calc MDL column when all trial results have been entered.
5. Print the current MDL Study
Click the Print button in the MDL Study form to print a report documenting the current MDL study
6. Delete the current MDL Study
Click the Delete button in the MDL Study form. The current study will be permanently deleted. Only do this if you want to remove the current MDL study from the system!
MDL Study window: navigation & fields
The First, Prev, Next, and Last navigation buttons will scroll through existing MDL studies. The most recent MDL study will be the first entry, the last entry will be the oldest study. Clicking on the elipses (3 dots) button located to the right of the Method field will display a list of all MDL studies stored in the system. The user may then select a particular study from the list for editing or review.
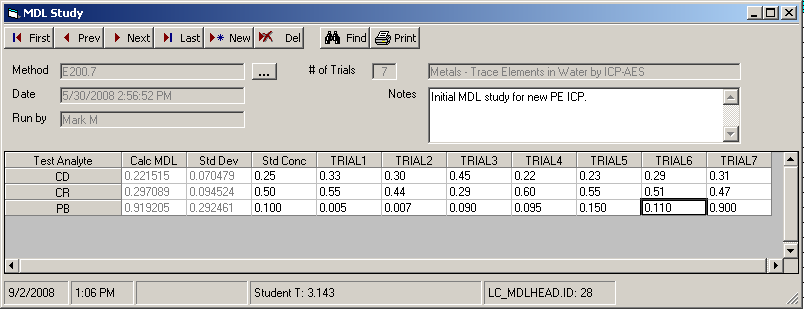
Note the header information displayed for each study: analytical method and description, study date, technician that ran the study, number of trial replicates configured for the study, and any notes. The result data for the study is located in the grid below the header information. Each analyte for the method is listed in its own row. The columns contain user entry slots for the analytical result of each trial, plus the Std Conc column for documentation of the known standard concentration used.
The result data area also contains columns holding automatic calculations based on the trial data input by the user. The Std Dev column holds the calculated Population Standard Deviation statistic for the trial results for the respective analyte. This value will update with every trial result that has been entered. The Calc MDL column holds the calculated MDL value for the the analyte, based on the product of the Std Dev column with the Student T value appropriate for the number of trials. The MDL value will not be displayed until data for all trials has been input by the user.
Please note that the main MDL Study form will display field data using a light gray font for any data that cannot be edited by the user.
The info bar at the bottom of the MDL Study window displays the current date and time, the MDL study header database record ID number, and Student T value used to calculate the MDL value for the current study.
Creating a new MDL study:
In the main MDL Study form, click the New button. The New MDL Study dialog box will appear.
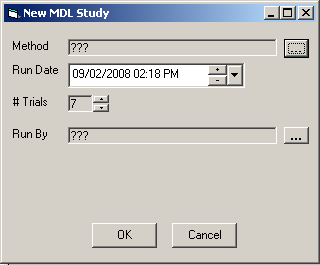
The header data for the new MDL study is set using this dialog. Use the elipses button(s) to open a list of available selections for their associated fields. Use the number scroller buttons to increase or decrease the number of trials. The Student T value will automatically adjust accordingly. Dates can be incremented or decremented by clicking on the plus or minus buttons, or a calendar selection can be activated by clicking on the down arrow adjacent to the date field. When the study header information has been completed, click the OK button to create the MDL study, or click Cancel to return to the main window without creating a study.
Upon creation of a new MDL study, the new study will become the current study in the MDL Study window. The result fields and statistics will be blank, waiting for user data to be entered. The user can also add comments in the Notes field.
Printing a MDL Study:
In the main MDL Study form, display the MDL study to be printed, either by scrolling through existing studies or using the elipses button to select the study. When the desired study is displayed, click on the Print button. A spread report documenting the study will appear in preview mode and can then be sent to a system printer if desired.
Deleting a MDL Study:
In the main MDL Study form, display the MDL study to be deleted, either by scrolling through existing studies or using the elipses button to select the study. When the desired study is displayed, click on the Delete button. You must confirm that the study is to be deleted by clicking the OK button in the confirmation dialog. Or you may select Cancel to abort the deletion process.
|