|
Used to setup the Location list in Hach WIMS. Variables are assigned to locations making them easier to find using Edit/View Variables. The Location tree can be rearranged (reordered) by dragging and dropping the location. |
 |
FIELDS:
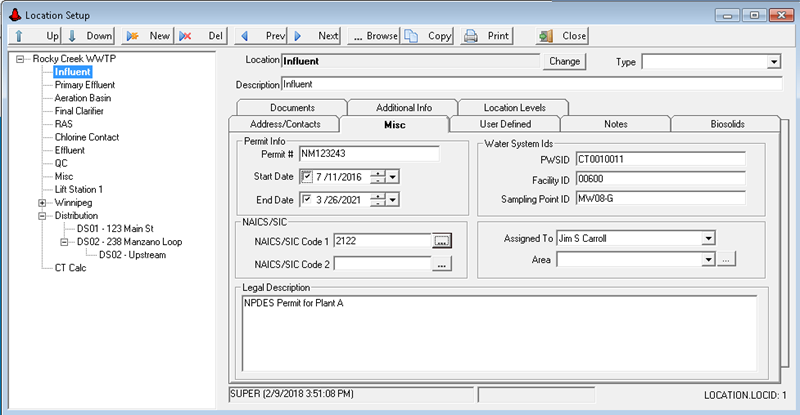
Location: A 50 character field for the location. The Location field will be displayed on the Variable Setup Location pull down list and on the Locations List of the Variable Browser.
Description: A 250 character field for entry of the long description for the location.
Type: Sets the Location Type.

Permit #: Permit number for the location.
Start Date: Start Date for the permit. To enter a date you must first check the box next to the date.
End Date: End Date for the permit. To enter a date you must first check the box next to the date.
PWSID: Federally assigned Public Water System Id (AKA WS ID)
Facility ID: A state-assigned value that identifies the water system facility.
Sample Point ID: The unique code for identifying a sampling point within the facility.
NAICS/SIC Code 1: Sets the North American Industry Classification System (NAICS) or Standard Industrial Classification (SIC) for the location. Typically used when the location represents an industry for an industrial pretreatment system. Use the  to select a code.
NAICS/SIC Code 2: Sets the North American Industry Classification System (NAICS) or Standard Industrial Classification (SIC) for the location. Typically used when the location represents an industry for an industrial pretreatment system. Use the to select a code.
Assigned To: Assigns the location to a person from the Personnel List.
Area: The Area this location is assigned to. Assigning locations to Areas allows you to build a tree view of your system.
Legal Description: Typically used in Industrial Pretreatment applications, this is a description used to identify the location.

Site Address: The Physical Address of the location
Mailing Address: The mailing address for the location (if same as Site address use the  button to copy the Site Address to the Mailing Address).

Used to track basic information if the Location is a Biosolids site.
Owner: Text field used to identify the owner of the site.
Crop: The crop planted at the site.
Acres: Number of acres for the site.
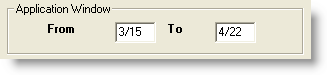
Application Window: Sets the days of the year that Biosolids can be applied. For example if you can apply Biosolids from March 15th thru April 22nd enter as follows:
Soil Information Series: The name of the soil series. Soils with similar characteristics are grouped and designated by their soil series. Names are often the name of the place where the series is well expressed, such as Hagerstown silt loam.
Soil Information Texture: Identifies the texture (which determines the water retention and transmission properties of the soil). Examples: Sand, clay, loams...
Soil Information Drainage: Characterizes the frequency and duration of water saturation. There are several classes of soil drainage, based on runoff potential, permeability, and internal drainage. Examples: Very Poor, Poor, Good...
Soil Information Water Table: The depth to the water table.

Used to enter any comments or notes about the location.

Nine user defined fields can be used to store any information required that is not provided for in a standard field. NOTE: Database Field Names for User Defined fields are Location.UD1 thru Location.UD9.

Any document may be added to the location. These can be graphic files (jpg, png, bmp...), office documents (.doc,.xls...). The document is stored in the WIMS database (FILES table as a blob) and can be viewed by clicking the View button. This will view the document in whatever program is associated with the file extension (just like you double click on a file in Windows Explorer).

Displays each level of the location path. The Location Level fields (LVL1_ID,LVL2_ID,...,LVL8_ID) can be used to find all locations within a group. See Using Location Levels for examples. The Refresh All button is used to update all the levels for all location records if they get out of sync (this can happen if an external program or interface adds locations, etc...).

Lists the Events that have occured that are associated with the location.
BUTTONS:

- Up - Moves a Location upward on the tree
- Down - Moves a Location downward on the tree
- New - Creates a new Location
- Del - Deletes the current location. You will be prompted for confirmation. NOTE: Variables assigned to this locaiton will NOT be deleted, however they will no longer be associated with a location.
- Prev - Navigates to the previous Location in the tree, up to the top root level and then stops
- Next - Navigates to the next Location in the tree, down to the last Location and then stops
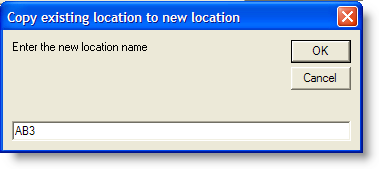
- Copy - Copies the location and it's variables if so desired. You will be prompted for the new location name:
Then you will asked if you want to copy the variables associated with the location to the new location.
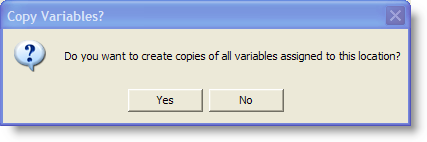
If you select Yes, the new variables will be created at the end of the variable list with the same spacing as the existing variables.
-
Print - Displays a simple report showing the Location and Description.
-
Close - Closes the Location Setup
Moving Locations in the tree
You can move locations within the tree by dragging and dropping the location to the spot in the tree. You can also use the Up and Down buttons to move the location within it's parent.
To move a location between 2 other locations, click on the location and drag, when the mouse is between the 2 locations they will turn blue. Release the mouse button and the location will be moved. Example move Chlorine Contact between Final Clarifiers and Effluent:
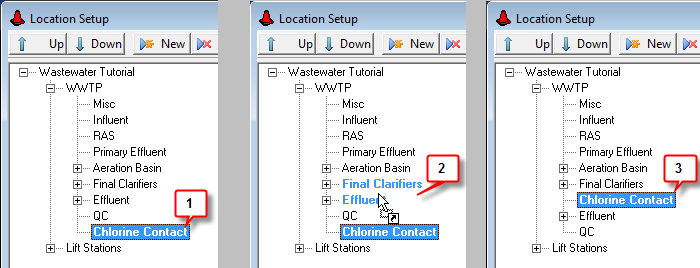
1. Click and hold the mouse down on Chlorine Contact
2. Drag the mouse between Final Clarifiers and Effluent, those 2 locations will turn blue indicating Chlorine Contact will be moved between those locations.
3. Release the mouse and the location is moved.
To move a location to a new parent. For example to move QC from WWTP and assign it to the root (i.e. Wastewater Tutorial):
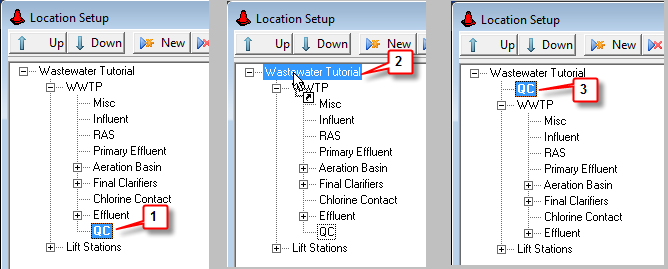
Click and hold the mouse down on QC
2. Drag the mouse on to Wastewater Tutorial. Wastewater Tutorial will be highlighted.
3. Release the mouse and the location is moved.