This is the source configuration screen for the Hach WIMS Direct Server-Side Interface to Generic LIMS CSV Files. First of all, we need to ensure the data files can be read by this interface.
Assumptions and Constraints:
- The source data files must be Microsoft Excel 97-2003 Worksheet file (.xls) files. NOTE: .xlsx files are NOT Support, Excel 5.0/95 files NOT support.
- The first row is either a header row (has a short 1 - 2 word description for the column) or it is data.
- Data must start either in the first or second line (row) of the file.
- All files located in the Import Folder will be processed.
- All files in the Import Folder must have the same configuration that is explained in this article.
- If you are using Wide Format, qualifiers must be included in the result column (cannot be in a seperate column) and cannot have spaces - i.e. <2 is valid, < 2 is not valid.
- This tool will only process a total of 32,000 lines of data included in all files of the Import Folder.
NOTE: The interface will only process up to 32,000 lines per session. It will process files until it reaches 32,000 lines and stop. It will not process the file it stops on. A file containing more than 32,000 lines will need to be broken down into multiple files with less than 32,000 lines in each file.
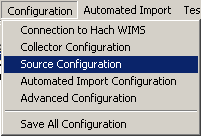
In order to configure source connection from the interface, click Configuration and select Source Configuration.
The next screen will display control buttons and parameters that need to be filled in. Notice there are two tabs - one for Source File Configuration and one for Column Mapping. Source File Configuration needs to accomplished before Column Mapping if a file is available. The automation included with Column Mapping will require a sample data file, comma delimited.
Source File Configuration:
Control buttons for both tabs are:

- Apply Settings - this will apply the settings to the program temporarily
- Save Settings - this will save the settings for subsequent runs
- Help - brings up the help documentation
- Close - closes the source configuration screen
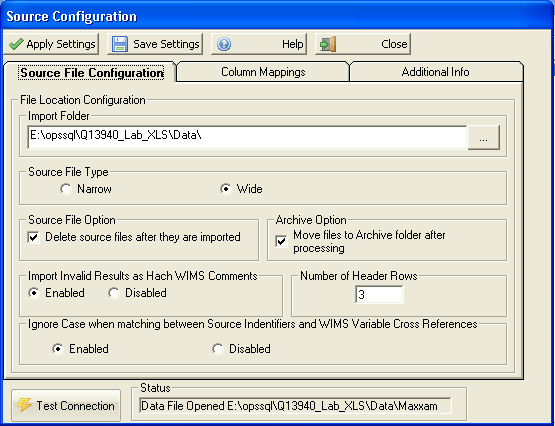
Parameters for Source File Configuration:
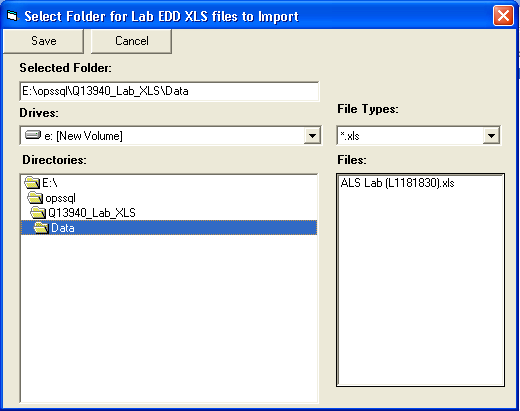
- IMPORT FOLDER - specifies the folder (location) of the Lab XLS files to be imported. The interface will attempt to import all xls files contained in this folder when you run it. Click the elipse button
 to bring up the file browser:
- Source File Type - The interface suports two types of files. Narrow has one result per row for a location/analyte and Wide has multiple analyte results for a location per each row. See Wide Format Example or Narrow Format Example for details.
- Number of Header Rows - Number of rows at the top of the sheet that are header row or do not contain data. Set to 0 (zero) and the interface expects data to start on the first row.
- Source File Option - this option determines what to do with source files after they have been imported. If checked, the interface will delete the source file after the data has been imported. If there are many files that total more than 32,000 lines all together, checking this box will enable the ability to process what the interface allows (maximum of 32,000 lines) and remove from source folder. Then rerun the interface to get the next batch of files. A single file with more than 32,000 lines will not be processed, break the file out into several smaller files.
- Archive Option - This option determines if the source files are archived after they have been imported. If checked, source files will be copied to the Archive Folder which is located under the interface exe folder. For example, if the interface is installed in C:\HachWIMS\Q13940 the files will copied to C:\HachWIMS\Q13940\archive.
-
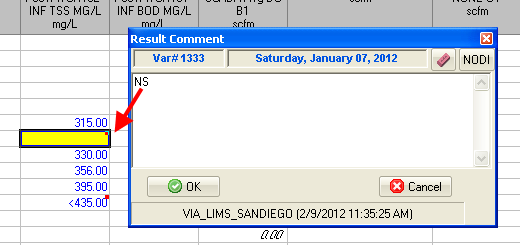
Import Invalid Results as Hach WIMS Result Comments - When importing a result if the result is not a valid value for WIMS, import the result as a result comment. For example, the Result in LIMS is NS which is not a value that can be entered into WIMS (i.e. NS is not a WIMS symbol) the NS is imported as a Result Comment and the value in WIMS is left blank. NOTE: Will overwrite any existing result comment.
-
Ignore Case when matching between Source Identifiers and WIMS Variable Cross References - enable this setting when you need to ignore case during matching to Source records to WIMS variable cross reference fields. For example, if the source file lists the analyte for BOD as BOD and/or bod you would need to enable this setting.
- TEST CONNECTION - checks to make sure the folder selected exists.
Column Mapping
Note: The first time you click on the Column Mappings tab, source configuration will attempt to open the first data file in the Import Folder. This will load some data into memory so that when you click the elipse button , the program does not have to reload a sample of the data each time. When you change the Import Folder location, the program will have to reload sample data.
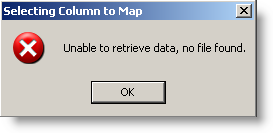
If there is no file, then the elipse buttons cannot be used. The following error message will be displayed.
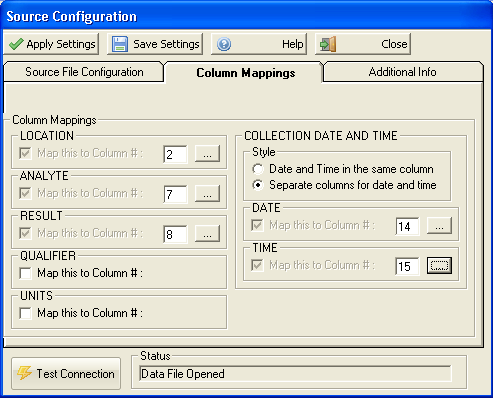
Simply enter the column mapping by hand and save settings. It is a good idea to recheck the column mapping settings when a source data file is available in the Import Folder. The following display shows the Column Mappings screen and each column setting is explained below.
Column mapping:
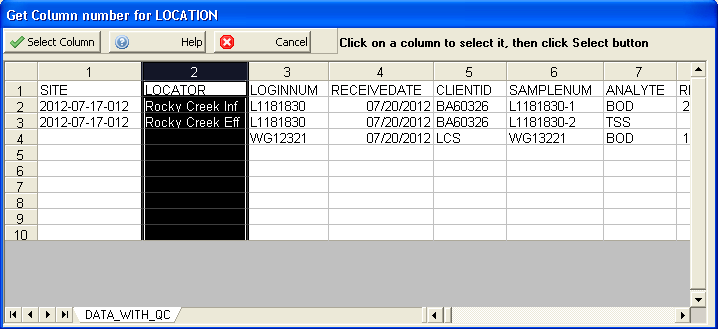
In order to complete this section, a LIMS CSV File should be available. Click the elipse button (  ) to view source data. This option is explained in Select Column for Mapping
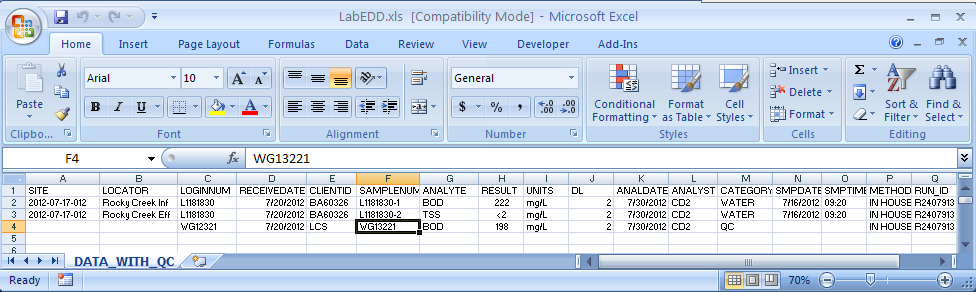
File shown in Excel:
Parameters for Column Mapping are:
LOCATION - This parameter is the location that uniquely identifies our analyte, we determine that LOCATOR suits our purpose for LOCATION, so we enter 2 (two) in the box since it is the second column (B).
ANALYTE - This parameter is the test or analyte performed, the Analyte column will be used as our ANALYTE NAME, so we enter 7 (Column G). Used with Narrow Format only.
RESULT - This parameter is the column that containts the results from the test, the column containing the results in our example is RESULT column, shown as column H which is the eight column, so we enter 8 (eight)
QUALIFIER - This parameter, if used, identifies what column contains the qualifier of the data.
UNITS - This parameter, used only if you are using Units Conversion, identifies what column contains the units of the data. In our example this is column I so we enter a 8.
STYLE - This parameter defines whether the date and time are in one field or two. When Date and Time in the same column is checked, only the Date column needs to be supplied. If these are in two seperate columns, as in our example, then we enter the column number for date and the column number for time
DATE - This parameter is to specify the column for the date or date and time depending on how the previous parameter was answered. In our example the date is in column N so we enter a 14.
TIME - Since we have two seperate columns for date and time, we have to specify the time column, which is O, so we enter a 15.
Additional Info Tab
The additional info table allows you to import data from other columns into WIMS data additional info fields. For example, you can setup an additional info field in WIMS called SampleNumber and import data from the Lab Number field in the Excel file shown above.
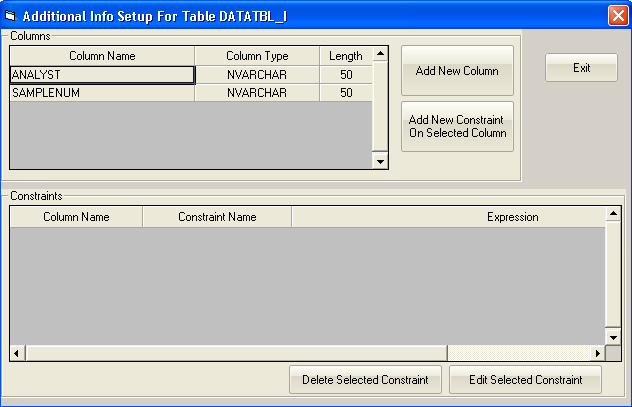
Step 1: Setup Data Additional Info Fields in WIMS:
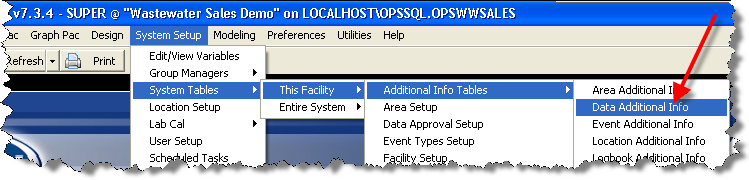
Use Add New Column Button and create your fields. In this case, we added two fields - Analyst and SampleNum:
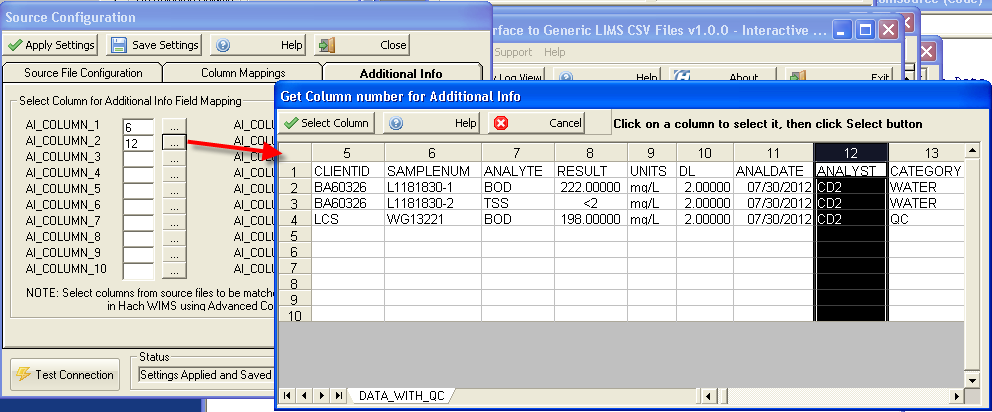
Step 2. Setup which columns from the Excel file will be available for Additional Info configuration:
Using the ... button map AI_COLUMN_1 and AI_COLUMN_2. AI_COLUMN_1 will be mapped to the SampleNum field and AI_COLUMN_2 to the ANALYST column:
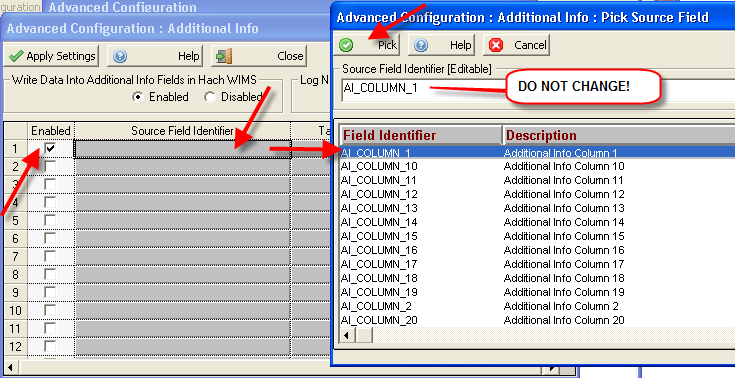
Step 3. Use Advanced Configuation, Additional Info to cross reference the AI_COLUMNS to Additional Info fields in WIMS:
Go to Configuration > Advanced Configuration > Additional Info tab > Configure Additional Info
Enable Write Data Into Additional Info fields in Hach WIMS by selecting Enabled
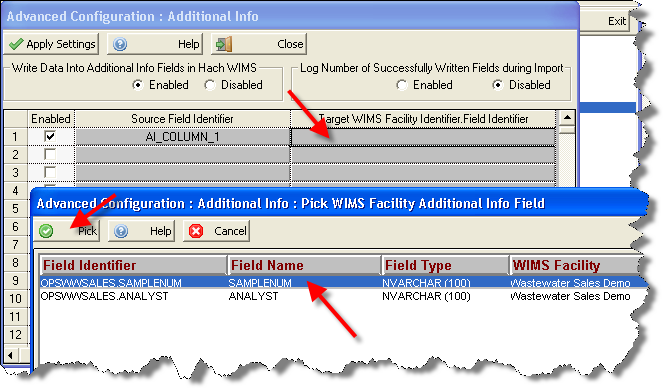
Click Enabled on row 1, click on Source Field Indentifer button and pick AI_Column:
Click on Target WIMS Facility Identifier Field Indentifier button on Row 1 and choose which additional info field the AI_COLUMN_1 data goes to:
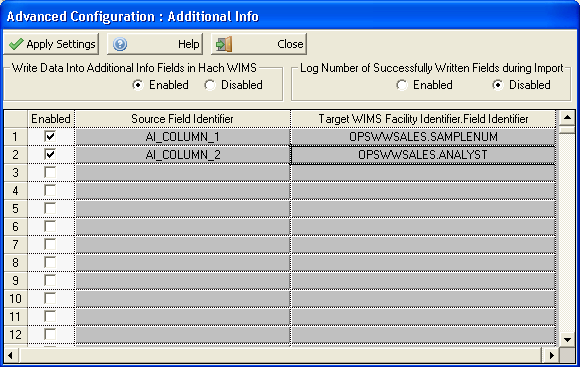
Now setup AI_COLUMN_2 to the Analyst Addtional Info field. Final configuration should look like this.
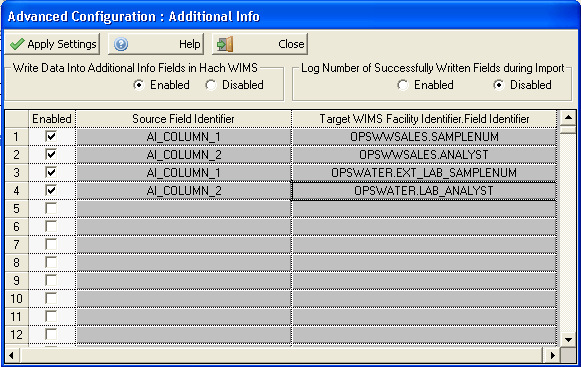
NOTE: When interfacing to multiple facilities you MUST map the Additional Info fields for each facility as they can have different Additional Info Fields. In example below we map AI_COLUMN_1 to the additional info field SAMPLENUM in OPSWWSALES database and to EXT_LAB_NUMBER in OPSWATER:
Lab Cal
Adds the ability to pull in Sample data from excel file to Lab Cal in WIMS.
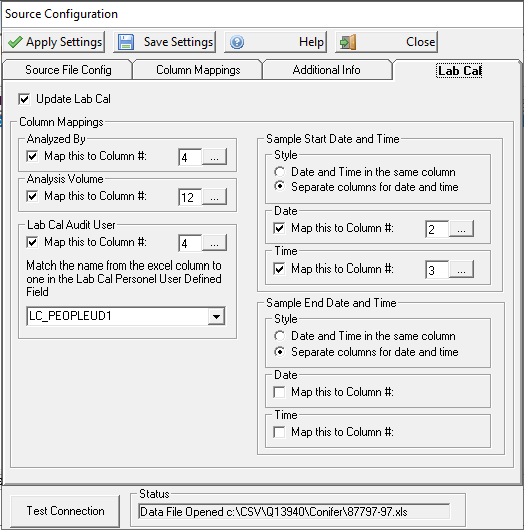
Update Lab Cal - Feature is activated if the box is checked.
Analyzed By - Column to get the Analyzed by person.
Analysis Volume - Column to get the Analysis Volume from.
Lab Cal Audit User - Column to get the Lab Cal Audit User from.
Note: The name from the excel file will be matched to a name entered in the Lab Cal Personel User Defined Field selected from the dropdown to determine the audit user.
Sample Start Date and Time - Column((s) to get Date and Time for SampleTest Start Date.
Sample End Date and Time - Column(s) to get Date and Time for SampleTest Completed Date.