How to Import Data from Aspen into SQL 2000
Microsoft Sequel Server 2000 has a utility called DTS Import/Export Wizard. DTS stands for Data Transformation wizard. This wizard can be used to import data from your Aspen working.mdb into MS Sequel Server 2000. Before you import data you will need to create a SQL database and run the scripts provided when you purchased Aspen Enterprise. After the scripts run all Tables, triggers and constraints will be created.
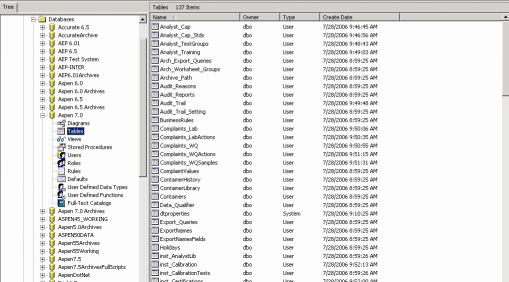
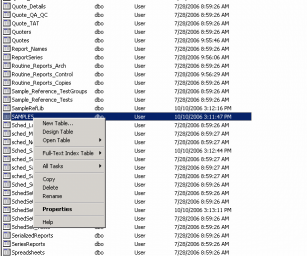
There are numerous tables in Aspen that have auto number fields. These same fields in MS SQL are referred to as Identity fields. The tables with Identity fields are listed in the section below titled Groupings of Aspen tables for importing into SQL. If you have data to import into any of the tables with identity fields you will need to remove or set the identity to No. For example let’s look at the Samples table. Click on the table and then right click to get more menu options.
Select Design. You will be presented with a list of fields and their datatypes.
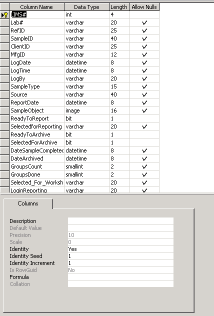
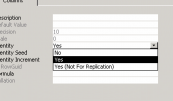
Notice that the LIMS number field is an integer and the column allows nulls is not checked. If we look at the bottom portion of the screen you will notice that the setting Identity is set to Yes. Click in this field and change the value to No.
Close the table and confirm saving of the structure. Continue to do this for all tables you wish to import data into that have identity fields.
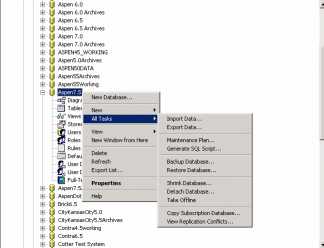
Now you are ready to start the DTS wizard. Select the Database and then right click, selecting the All tasks. This will then present another listing of menus, select Import Data.
The DTS wizard starts up.
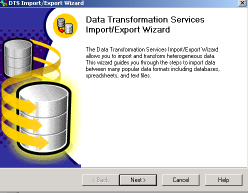
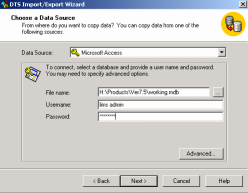
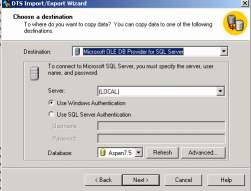
Click Next. You will need to select Microsoft Access from the drop down list for your Data Source. Next enter the file path and name to working.mdb. You can use the browse function by clicking on the ellipses button next to the field File Name. Now type in your lims administrator Username and password. Before you click Next you must click on the Advanced Button.
You need to enter the path to the workgroup file apsen.mdw in the property Jet OLEDB System Database. You can simply click in the value column and type in the path and file name (there isn’t the option to browse to this file – you will need to type in the value).
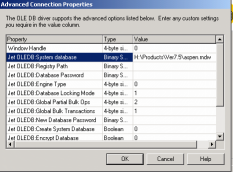
When you are done click OK. You will be brought back to the originating form. You can now click on Next. If you did not enter the correct path to the aspen.mdw file when you click on Next an error message will be displayed indicating that you do not have permissions.
The next form asks if you want to copy the tables or create a query. For this article we will select Copy.
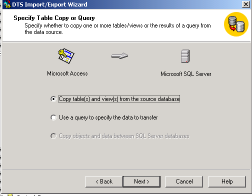
Click Next. Now a list of tables found in working.mdb will be presented.
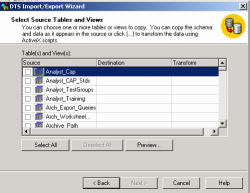
Select the tables you want to import. You must select a grouping of tables as outlined below. If you don’t have any data to import into a table do not check it. You will need to import data from the “First Group” and then start the DTS wizard again to import data from the Second group. This is important to prevent errors due to referential integrity.
Groupings of Aspen tables for importing into SQL
First Group:
- **Analyst_Cap
- **Analyst_CAP_Stds
- **Analyst_TestGroups
- **Analyst_Training
- Arch_Export_Queries
- Arch_Worksheet_Groups
- Audit_Reports
- Audit_Reasons
- **Audit_Trail
- Audit_Trail_Setting
- BusinessRules
- **Complaints_Lab
- **Complaints_LabActions
- **Complaints_WQ
- **Complaints_WQActions
- **Complaints_WQSamples
- ComplaintValues
- ContainerLibrary
- Data_Qualifier
- Export_Queries
- ExportNames
- ExportNamesFields
- **Holidays
- inst_AnalystLib
- inst_SalesRepLib
- inst_ServiceRepLib
- inst_SuppliersLib
- inst_SupplierPartsLib
- inst_VendorLib
- inst_VendorSalesRepLib
- inst_VenServiceRepLib
- inst_Instrument
- **LAB#
- LabSections
- LocationLib
- LoginValues
- ManufacturerLib
- **MDL_Study
- MDL_Study_RelatedTestGroups
- MDL_Study_Tests
- OPSFacilities
- **PrepBatches
- Preservatives
- QC_Codes
- QC_Group_Ref
- **QC_Samples
- QC_Tests_Ref
- QC_Types
- Quote_Code
- Quote_QA_QC
- Quote_TAT
- Quoters
- **Quotes
- Report_Names
- SampleRefLib
- **SAMPLES
- **Sched_Samples
- SchedSet
- Spreadsheets
- SubcontractorLib
- SubmitterLib
- SubmitterLib_Contacts
- SubmitterLib_Reports
- tbl_XMLDupNode
- tbl_XMLKeyNode
- tbl_XMLRecFld
- tbl_XMLRoot
- tbl_XMLSpecLib
- TestGroupLib
- TestLib
- **Worksheet#
- Worksheets
Second Group:
- ContainerHistory
- Containers
- **inst_Calibration
- inst_CalibrationTests
- **inst_Certifications
- inst_CertificationTests
- **inst_Components
- **inst_Devices
- **inst_Parts
- **inst_PM
- **inst_Service
- Locations
- Manufacturers
- **Prep_QC_Samples
- Prep_QC_TestGroups
- Prep_QC_Tests
- Routine_Reports_Copies
- QC_Pointers
- QC_TestGroups
- QC_Tests
- **Quote_Details
- **ReportSeries
- Routine_Reports_Arch
- **Routine_Reports_Control
- Sample_Reference_TestGroups
- Sample_Reference_Tests
- Sched_Locations
- sched_Manufacturers
- sched_Notes
- sched_Samples_TestGroups
- sched_Samples_Tests
- sched_SampleSchedule
- Sched_Submitters
- SchedSet_Samples
- SchedSet_Schedule
- SchedSet_TestGroups
- SchedSet_Tests
- SerializedReports
- SeriesReports
- TestGroup_TestLib
- TestGroupLib_TestInst
- TestGroupLibCalcs
- TestGroupLibCalcs_Tests
- TESTGROUPS
- TESTS
- **Worksheet_Groups
** Indicates tables with Identity fields
After you are finished importing data without any errors you must go back to the tables with identity fields and set the identity back to Yes and set the Seed value. The set value is the last value for the identity field. For example you can open the Samples table and find the last LIMS#. If this LIMS# is 16789 that is the value you would enter into the Identity Seed field.
Once you have set the Identity back to Yes and set the Seed Identity value, close the table and save your changes. Repeat this for all tables that you previously changed the Identity to No.