Q14450 Create Vars from Lab CSV Utility is intended to be a "preprocessor" of CSV files using the Q12351 LIMS CSV Interface. The Utility will scan the files and create locations and variables for CSV records where a variable is not cross referenced.
Example: The Lab CSV file contains routine water distribution data (i.e. Cl2, Bacti results for our known sampling sites) and non-routine samples (customer complaint, new main, etc...). In WIMS we have setup and cross referenced variables for all the routine samples but not for the non-routine. The Utility would scan the CSV files, create variables/locations for the non-routine samples. After the utility is run, the Q12351 Interface runs and imports data for the existing routine data and the NEW non-routine samples.
Setup:
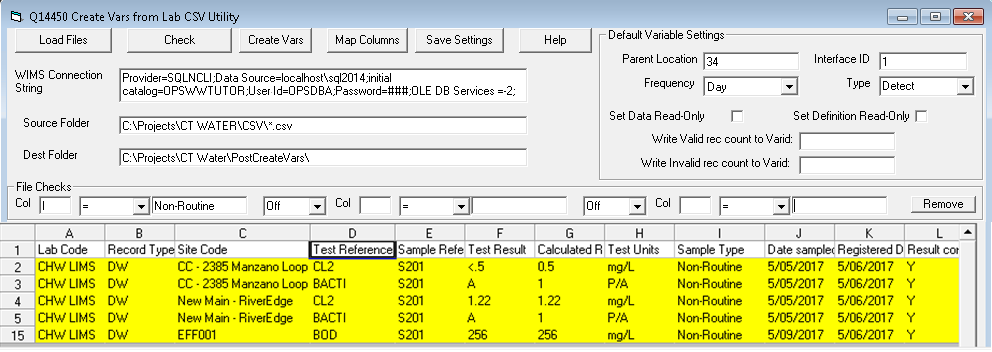
Fill out the fields (described below), click [Map Columns] button to set which columns correspond to which fields in WIMS. Then click [Save Settings] and your settings will be saved to the config.ini file. Save Settings also saves the filter and the state of filtering (i.e. is a filter currently applied). As this utility is typically used as a scheduled task to autorun prior to the interface run, note that the filter will be applied during the autorun if saved in that state. We may need to install and setup the interface twice if the CSV files apply to more than 1 facility. In this case, setup a filter to only see records (rows) for one facility then install another copy of the interface and setup a filter for the second facility.
WIMS Connection String: A connection string to the WIMS database. NOTE: If using the OPSDBA username, set password to ###.
Source Folder: Folder and File specification for the source CSV files.
Dest Folder: Folder to place CSV files in after processing is complete.
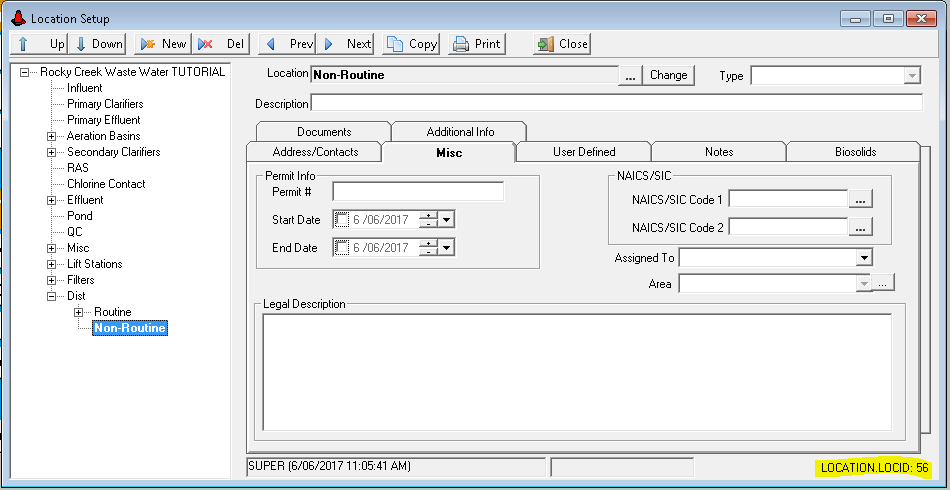
Parent Location: The Location ID of where you want to put the new locations. To find the Location Id, in WIMS go to System Setup>Location Setup. Click on the location and the ID will be shown in the lower right corner:
Frequency: The variable frequency (Daily, Hourly, etc...) of the new variables.
Type: The variable type (Parameter or Text Parameter) or you can set to detect. Detect will analyze the Result field and determine if it is a parameter or text.
Interface ID: The Interface ID to set the new variables to. To find the interface ID, in WIMS go to System Setup>Entire System>Server Side Interface Setup. Click on the row for the interface and the ID will be shown in the lower right hand corner.
Set Data Read-Only: For new created variables will set the Data Read-Only option. Data Read-Only marks all data for the variable as Read-Only, i.e. it CANNOT be entered, edited, or deleted in WIMS, only interfaces can write data to the variable.
Set Definition Read-Only: For new created variables will set the Definition Read-Only option. This option marks the variable's setup as Read-Only, i.e. no fields can be changed (name, units, etc...). Only Super Users or managers with the Allowed to edit Variable's Definition Read-Only Setting can edit the variable.
Click the Map Columns button to setup which columns correspond to which fields in WIMS. Example, Column G in the CSV file holds the LIMS Loc.
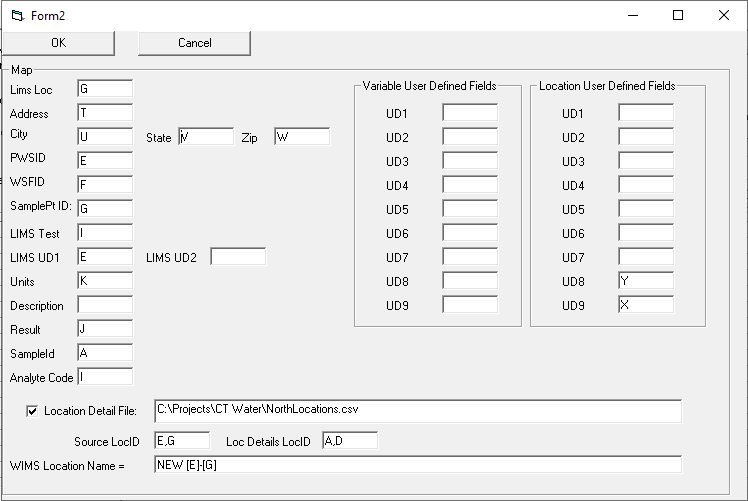
LIMS Loc: (Required) Will be matched to the Vardesc.LIMS_LOC Interface field. Also, if the variable is not found, the utility will check if the location exists in the Parent and if not will create a location with this name.
Address: If mapped will populate the Location.SiteAddress Field.
City: If mapped will populate the Location.SiteCity field.
State: If mapped will populate the Location.SiteState field.
Zip: If mapped will populate the Location.SiteZip field.
PWSID: If mapped will populate the Location.PWSID field.
WSFID: If mapped will populate the Location.WSFID (Facility Id) field.
SamplePt ID: If mapped will populate the Location.SAMP_POINT_ID (Sampling Point ID) field.
Analyte: (Required) Will be matched to the VarDesc.LIMS_TEST interface field.
LIMS UD1: (Required if your CSV interface uses the LIMS UD1 field). Will be matched to the VARDESC.LIMS_UD1 field.
LIMS UD2: (Required if your CSV interface uses the LIMS UD2 field). Will be matched to the VARDESC.LIMS_UD2 field.
Units: Sets the VARDESC.Units field
Description: Sets the VARDESC.DESCRIPTION field.
Result: (Required if you set the Type to Detect). Used to determine the variable type. Used to set the VARDESC.VARTYPE field.
Analyte Code: If mapped will populate the VARDESC.ANALYTECODE field
Variable UD1 thru UD9: If mapped will populate the VARDESC.UDx field.
Location UD1 thru UD9: If mapped will populate the LOCATION.UDx field.
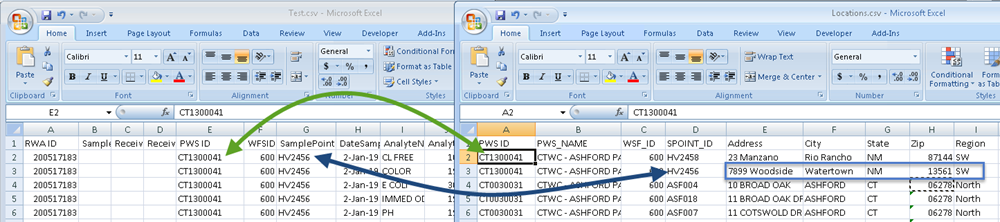
Location Detail File: If checked allows a separate file with additional Location information to be joined with the Source File. You then specify the Location file path. This can be used when the Source CSV file just has key field(s) to identify the location (no address, etc...) The Locations Detail File can then be matched to those key field(s) and used in the import. Example, my source file has PWSID and SampPtId. I have a files (locations.csv) that has the PWSID and SampPtId along with the address for those locations. I can join/lookup the address for each source record which will allow me to import the address information when creating the new locations.
Example: Match PWSID and SamplePointId (columns E,G) of the results csv file (shown on left) to the Locations csv file (shown on right) to columns A,D. This will allow us to import the Address, City, State, etc... when creating the location.